
Choose another installation method

INSTALLATION HELP · 01 / 04

Install with Docker

On a NAS or Linux PC.

Check your model’s compatibility, then follow the steps for your device.

Download the CUP Docker installation archiveZIP · Mac and Linux · TAR.GZ for Portainer on NAS

CHECK BEFORE INSTALLING

Can your NAS run Docker?

Enter the exact model, for example DS923+, TS-464, AS5404T, DXP4800 or F4-425 Plus. Search compares it with available official lists and shows the requirements to check.

CUP requires Linux kernel 3.10.108 or later. A browser cannot read the NAS kernel: connect over SSH, then enter the version shown here.

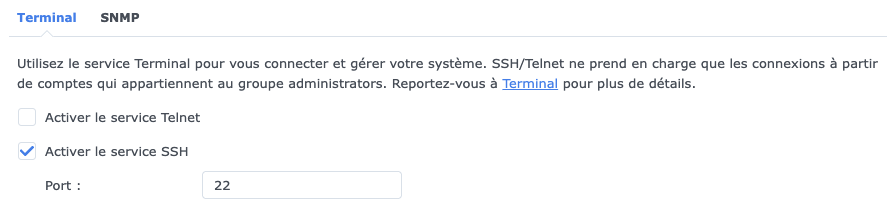
Enable SSH in the NAS settings if needed. In Terminal, replace username with your NAS account and nas_ip with its local IP address:

Synology DSM example: enable SSH under Control Panel, Terminal & SNMP, port 22
Synology DSM · Control Panel → Terminal & SNMP → Enable SSH service · port 22
ssh utilisateur@ip_du_nas

Once connected, display the kernel version:

uname -r
Manufacturer / modelsEngineRequirements to check
Synology117 listed modelsContainer ManagerDocker on earlier DSM versionsCheck Container Manager, DSM and the kernel (3.10.108 minimum). Take extra care with models launched before 2014: verify the actual version with uname -r.
ASUSTORAS61, AS62, AS31, AS32, AS63, AS64, AS52, AS53, AS65, AS71, AS66, AS67, AS54, AS72, FS67Docker EngineADM 4.3.3 minimum per the app listing
QNAPModels with Container StationContainer StationQTS 4.2.6+ or QuTS hero h4.5.0+ · 64-bit x86/ARM or 32-bit ARM CPU · 1 GB RAM minimum
UGREENDH4300 Plus, DXP2800, DXP2800 GT, DXP4800 Plus, DXP4800 Pro, DXP4800 GT, DXP480T Plus, DXP6800 Pro, DXP8800 PlusDocker / Docker ComposeDH4300 Plus and DXP models listed by UGREEN. DH2300 is unsupported. Check UGOS Pro.
TerraMasterExamples: F2-424, F2-425 Plus, F4-425 Plus, F6-424, F6-424 Max, F8 SSD, T12-500 ProDocker Engine / Container ManagerTOS 6/7 offers these tools. Confirm availability for the exact model in App Center.
UniFiUNAS 2 · UNAS 4 · UNAS ProNot documentedDocumentation reviewed describes network storage but does not list a Docker engine on UNAS.

This checks for Docker/container engine availability; it does not certify CUP on every NAS. CPU architecture, memory and software versions must also be suitable. If unsure, contact us before purchasing.

INSTALLATION HELP

Using GPT or Claude?

Ask it to help you install CUP, one step at a time.

Show prompt
I want to install CUP on a NAS with Docker. First ask for the exact make and model, system (DSM, QTS, UGOS, TOS…), Docker/Container Manager availability, CPU architecture and memory. If the kernel is unknown, explain how to read it over the local network using SSH:
  ssh username@nas_ip
  uname -r
CUP requires Linux kernel 3.10.108 or later. If it is lower, stop and recommend checking for a compatible system update. For models released before 2014, verify the actual version; do not decide based only on the release year.

Official CUP guide : https://cup-studio.com/en/instal/docker/

Guide me in plain English, one step at a time, and wait for my reply before continuing. Use the CUP guide and official documentation; do not guess menus, commands or compatibility. If information is missing, say so and help me verify it.

Security: never ask me for a password, activation code, licence serial number, key or token. I will enter licence details only in the official CUP installer. Do not suggest commands that erase, reset or replace data. Explain the effect of any command that changes the system and wait for my approval before asking me to run it. Do not expose sensitive services to the Internet. Ask me to hide personal information in screenshots and error messages.

Start by asking the first question needed for this guide.

Never share your NAS password or licence code/serial number with an AI.

STEP BY STEP · PORTAINER

Install CUP on your NAS

This method uses Portainer to build the image from the online archive, then create the CUP stack. It also works on NAS devices without the docker compose command, as long as Portainer and Docker are running correctly.

01

Check your NAS

The NAS must provide Docker/containers, and Portainer CE must be connected to its local environment. Check the model and, especially on an older NAS, read its kernel with uname -r (the compatibility guide explains how). CUP’s tested minimum is Linux 3.10.108.

Recent NAS — kernel with getrandom: the image uses the kernel’s native function.
Older NAS — kernel without getrandom: from the tested 3.10.108 minimum, the image detects this and automatically enables the APR fallback for this case.
Below 3.10.108: do not install CUP until a compatible update or model check is available. Docker must also start, and the CPU architecture must be supported.

02

Download the archive and prepare storage

Download the TAR.GZ archive below. In File Station, create a dedicated folder for CUP data, for example /volume1/docker/cup/cup_data. Do not use another CUP installation’s folder. Note the NAS’s local IP address and choose a free port, for example 18080.

Download the TAR.GZ archive for Portainer ↓
03

Build the image in Portainer

  1. Open local → Images → Build a new image.
  2. Name the image cup-installer:nas-test and choose URL.
  3. URL: https://cup-studio.com/downloads/CUP-Installer-Docker.tar.gz
  4. Dockerfile path: docker/Dockerfile. Select Build the image and wait for the Successful confirmation. Then check that cup-installer:nas-test appears in Images.

The build downloads required components and can take several minutes. It runs on the NAS; the archive is hosted on CUP Studio.

Screenshot from your test. The visible URL uses the old test folder: use the TAR.GZ address in this step and the cup-installer:nas-test tag.
04

Create the CUP stack

In Portainer, open Stacks → Add stack, name it for example cup-nas, and choose Web editor. Paste the Compose file below, then replace the IP address, port and data path with your values. The port must be free and the folder must exist.

services:
  cup-nas:
    image: cup-installer:nas-test
    container_name: cup-nas
    restart: unless-stopped
    ports:
      - "NAS_IP_ADDRESS:18080:80"
    volumes:
      - /volume1/docker/cup/cup_data:/srv/cup
    environment:
      TZ: Europe/Paris
      CUP_DATA_LABEL: /volume1/docker/cup/cup_data
      CUP_PUBLIC_URL: ""

Select Deploy the stack. In Containers, check that cup-nas is running and port 18080:80 is published. If the port is already in use, remove the stack, choose another free port and deploy again.

Screenshot from the test NAS. Replace the names, IP address, port and paths shown with the values for your installation.
05

Open the installer and finish setup

From a device on the same network, open http://NAS_IP_ADDRESS:18080 (using the port you chose). Create the owner login, enter the email and code associated with your CUP licence, then wait for the download and verification to finish. When the screen says CUP is ready, select Enter CUP and sign in with the login you created.

The local HTTP address is for first access on your network. Before allowing Internet access, configure a domain name, HTTPS and your NAS reverse proxy. Do not expose the container port directly to the Internet.

Actual first install form from the test NAS. The displayed storage path will match the one configured in your stack.
When this screen appears, select Enter CUP and sign in with the login and password you created.
06

Configure your CUP workspace

  1. In Management → Preferences, check your Production profile: display name, surname, email and phone.
  2. If you like, personalize CUP’s identity: display name, logo and colours. You can change these settings later.
  3. Before sending invitations, configure the SMTP server under Preferences → Installation & health and send a test email. If you do not have your provider’s settings, ask your hosting provider or email administrator.
  4. Enable two-step verification if it is available for your account, then save your preferences.
07

Take your first steps

  1. In the Production space, open Clients and create your first client with their name and contact details.
  2. Open the client record and create a project. Give it a name, choose its pipeline stages and add a short brief if useful.
  3. Import a few images into a series or gallery to check storage and previews. Start with a small batch of files.
  4. Once the test email works, invite a secondary email address or a trusted client to the project, then check the experience in a private browser window.

CUP files and projects remain in the data folder mounted into the container. Include that folder in your regular NAS backups.

08

Enable FTP/FTPS on a Synology (optional)

In DSM, open Control Panel → File Services → FTP. Enable FTP and FTP SSL/TLS (FTPS). The control port is usually TCP 21. Under FTP passive port range, keep the displayed range (default 55536–55899) or set a fixed range, then use that same range in the NAS and router firewall rules for Internet access. For SFTP, scroll to the SFTP section on the same page and enable the service: it uses TCP 22 and is a different protocol from FTP/FTPS.

For a local network test, no router port forwarding is needed. Avoid unencrypted FTP over the Internet. The NAS folder served by FTP must also be accessible to CUP inside the container and selected as its arrival folder; enabling FTP alone does not connect it to CUP automatically.

DSM 7 example: FTP/FTPS on port 21, passive range 55536–55899; configure SFTP in its separate section on this page, on port 22.

NEXT STEP · AFTER INSTALLATION

Make CUP reachable over the Internet

This diagram is for a self-hosted installation behind your own Internet gateway.

View the network diagram